Beef Tataki au Poivre: The Restaurant-Worthy 20-Minute Dish You Can Actually Make at Home
I ordered beef tataki at a Japanese restaurant, paid $22 for six thin slices, and sat there thinking, I could make this at home. Then I went home and overcooked it into a gray slab of disappointment.
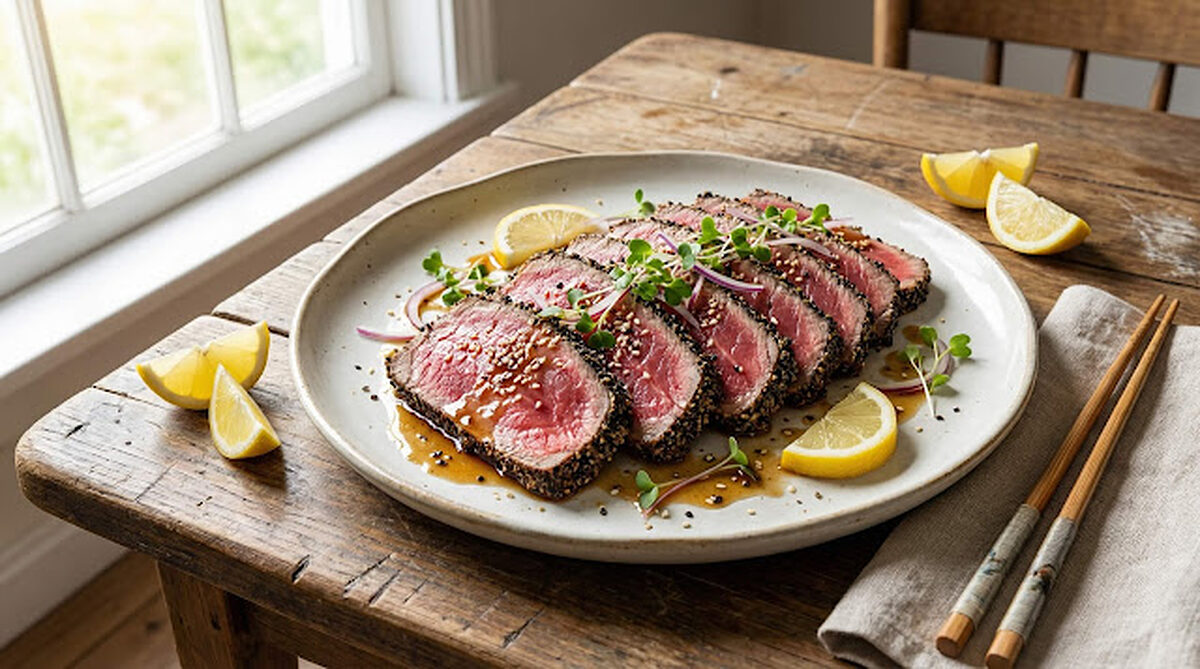
Beef tataki au poivre is lean beef (tenderloin or sirloin) crusted in cracked black pepper, seared hard for about 60–90 seconds per side so the center stays rare, then rested, sliced thin, and finished with a bright soy-citrus dressing. Total time is about 20 minutes, and it delivers roughly 26g of protein per serving.
Took me three more tries to nail it. The thing is, beef tataki au poivre sounds wildly intimidating. It’s not. It’s a seared, barely-cooked beef tenderloin sliced thin, finished with a punchy peppercorn-citrus sauce, and ready in 20 minutes. The French technique meets Japanese precision, and the result is honestly one of the most impressive quick healthy meals you can put on a table.
Beef tataki au poivre is a lightly seared, rare beef dish with a bold cracked pepper crust and a bright soy-citrus dressing. It needs one pan, 20 minutes, and a sharp knife. That’s the whole recipe.
So if you’ve been saving this for “someday at a restaurant”, today’s the day.
Tenderloin or Eye of Round?
Beef tenderloin or eye of round: Tenderloin is the premium pick, buttery, tender, and forgiving. Eye of round is leaner, cheaper, and works beautifully when sliced thin enough. I personally use eye of round on weeknights and save tenderloin for company. Both work. What doesn’t work is anything fatty or tough, the whole dish depends on thin, even slices that melt rather than chew.
Cracked black pepper (not ground): This is the au poivre part. Cracked peppercorns create a coarse, bold crust with heat and texture. Pre-ground pepper just disappears into the meat. Crack them yourself with the bottom of a heavy pan or use a coarse grinder setting, the difference is immediately obvious.
Soy sauce + citrus dressing: The Japanese soul of this dish. Soy brings umami depth, citrus cuts through the richness of the beef and brightens the whole plate. Use fresh lemon or yuzu if you can find it, bottled citrus juice is flat by comparison.
Sesame oil: Just a few drops in the dressing. It adds a toasty, nutty background note that ties the Japanese and French elements together. Too much and it overpowers everything, a little goes a long way here.
Secret weapon, ice bath after searing: Most recipes skip this entirely. Shocking the seared beef in an ice bath stops the cooking instantly and locks in that perfectly rare center. Without it, carryover heat keeps cooking the beef from the inside out, and you end up with a medium center when you wanted rare. Two minutes in ice water. That’s it.
Beef Tataki au Poivre
Ingredients
Method
- Prepare your ice bath first, a large bowl filled with ice and cold water. Have it ready before you touch the stove. This is non-negotiable.
- Mix cracked peppercorns and flaky salt on a flat plate. Roll the beef log firmly in the mixture, pressing to adhere on all sides.
- Heat a cast iron or stainless steel pan over maximum heat for 2 full minutes. Add neutral oil. It should shimmer and almost smoke immediately.
- Sear the beef for 30–45 seconds per side, all four sides if it’s a round log, rotating quickly. You want dark, aggressive color. Don’t move it while it’s searing, let the crust form.
- Immediately transfer to the ice bath the moment the last side is seared. Hold it submerged for 2 minutes. This stops all carryover cooking instantly.
- Remove from ice bath, pat completely dry with paper towels. Wrap tightly in plastic wrap and refrigerate for at least 15 minutes, cold beef slices far cleaner than warm.
- While the beef chills, whisk together all dressing ingredients in a small bowl. Taste it, it should be punchy, savory, and bright. Adjust lemon or soy to balance.
- Unwrap beef and slice as thinly as possible, 2–3mm slices ideally. A sharp knife is not optional here. Dull knives tear instead of slice and ruin the texture completely.
- Fan slices on a chilled plate. Spoon dressing over the top. Add red onion, cilantro, sesame seeds, and lemon slices.
- Serve immediately, or refrigerate plated and undressed for up to 2 hours before serving.
Notes
- Food safety: The inside of the beef stays rare. Buy a whole piece from a butcher you trust and sear every surface, since bacteria live on the outside of whole cuts. Don’t use ground or needle-tenderized beef.
- Easier slicing: Freeze the wrapped beef for 20 minutes instead of refrigerating; semi-firm beef slices paper-thin.
- Cracking peppercorns: Crush them under a heavy pan instead of grinding. You want coarse pieces.
- Gluten-free: Use tamari.
| Cut | Character | Best for |
|---|---|---|
| Beef tenderloin | Buttery, tender, forgiving | Company or a special dinner |
| Eye of round | Leaner and cheaper | Weeknights (slice thin) |
The Freezer Trick for Thin Slices
- Freeze the beef for 20 minutes before slicing. I personally found that a slightly frozen beef log slices two to three times thinner than a fully chilled one, and thin slices are everything in this dish. It’s the single biggest upgrade you can make to the final presentation.
- Use a slicing knife, not a chef’s knife. Long, thin blade, single smooth pull. Chef’s knives are too wide, they compress the meat as they cut. A boning knife or carving knife works perfectly.
- Don’t dress the plate until you’re ready to serve. The acid in the citrus dressing starts to “cook” the beef surface the moment it makes contact, just like ceviche. Dress at the last second for the cleanest presentation.
- The dressing doubles as a marinade, a grain bowl sauce, and a dipping sauce for almost anything. Make extra. You’ll use it all week.
Why the Ice Bath Matters
Why the ice bath is non-negotiable: Beef keeps cooking after it leaves the heat, that’s carryover cooking. In a thin sear like tataki, where you’re only cooking 2–3mm of the surface, even 60 seconds of carryover heat penetrates significantly deeper into the raw center. The ice bath drops the surface temperature from ~180°F to ~35°F in under two minutes, stopping carryover dead. Skip it and your “rare” tataki becomes medium by the time it hits the plate.
Knife tip: Hone your slicing knife before every use, a honing steel realigns the blade edge without removing metal. Do it every time you use it, not just when the knife feels dull. A sharp blade is the difference between clean tataki slices and ragged, torn ones that fall apart on the plate.
Lean beef like tenderloin or eye of round is one of the best protein sources for weight loss and muscle retention, high in iron, B12, and creatine, with minimal fat and zero carbs (per USDA FoodData Central). In short, twenty minutes for that nutritional profile is genuinely hard to beat.
Gray Centers and Torn Slices
“The center was gray and overcooked” → Seared too long, or skipped the ice bath → Keep each side to 30–45 seconds on maximum heat, and hit the ice bath immediately. Carryover heat is the culprit every time when the pan and timing were right.
“The slices tore and fell apart” → Knife wasn’t sharp enough, or beef wasn’t cold enough → Freeze for 20 minutes before slicing and use a long, thin slicing knife with a single smooth pull. Never saw back and forth.
“The dressing was too salty” → Soy sauce ratio too high, this happens with different soy sauce brands → Balance with more fresh lemon juice first, then a touch more honey if needed. Taste as you go, soy sauces vary dramatically in saltiness.
Tuna Tataki and Other Variations
- Gluten-free: Swap soy sauce for tamari, identical flavor, no gluten, no compromise
- Lower sodium: Use coconut aminos instead of soy sauce, naturally sweeter and about 65% less sodium
- Different protein: Tuna tataki works beautifully with the exact same method, sear a block of sushi-grade tuna 20 seconds per side. Same ice bath, same dressing, completely different dish
- Creative twist: Add a thin smear of wasabi crème fraîche under the beef slices before plating, the cool creaminess against the peppery beef crust is completely over the top in the best way. Or finish with a few drops of truffle oil if you’re feeling extra
Making It Ahead
- Fridge (unsliced): Wrap the seared beef log tightly in plastic wrap and refrigerate for up to 2 days before slicing. This actually improves the texture, the flavors develop and the beef firms up for cleaner slices.
- Fridge (sliced and dressed): Honestly, don’t. The acid dressing starts breaking down the beef surface within an hour. Slice and dress only what you’re serving immediately.
- Dressing: Keeps in a sealed jar in the fridge for up to 5 days. Use it on grain bowls, salads, as a dipping sauce, it’s versatile enough to justify making a double batch every time.
- Freezer: Don’t freeze cooked tataki. The texture suffers badly. Freeze raw beef if needed and sear from thawed.
When you’re building the full spread, start with this tataki, serve our 5-Minute Air Fryer Lemon Herb Asparagus on the side, and finish with our No-Bake Chocolate Oatmeal Cookies for dessert. Four recipes. Under an hour. Restaurant night at home, handled.